You can often find me here

You can often find me here

Thursday, December 8, 2011

Disappointments and Plans

My trip to the Appalachian Potters Market last Saturday was a BIG disappointment.  For the first time ever, I lost money going to a show.  I had such high hopes (some folks might describe it as having unreasonable expectations) and was so excited about getting in that not doing well was even more disappointing that it might normally be.  Who am I kidding?  I'm bummed that I worked my butt off and didn't make any money.

Looking for the silver lining in this dark storm cloud of pottery related despair, I have chosen to view this as an opportunity.  I had been considering having a home sale before Christmas.  Since I didn't sell anything last weekend, there is lots of really cool pottery still available.

I am happy to announce:
Susan Jones Pottery
CHRISTMAS SALE
SATURDAY, DEC 17, 10 AM TO 4PM


Jeff and I would love to see you if you can drop in at our house at 1961 Maple Springs Church Rd, Shelby, NC 28152.  (Let us know if you need directions.)


Friday, November 25, 2011

Footed Bowl

I realized the other day that I was out of larger bowls.  I hadn't made any bowls in a long time and had almost convinced myself that I didn't really like to make them.  These started with about 4 pounds or 4.5 pounds I think.  It might have even been 5 pounds.  That is a pretty basic bit of information that I should remember, but alas.  

I left a lot of clay in the bottom so that I could trim a big foot on the bottom of the bowl.  Allen has taught me to use a push pin in the bottom to keep from trimming too much clay away.  


Once I cut the bowl off the bat, I centered it on a foam bat so that I could trim it.  


First, I removed clay from the outside edge.  I trimmed in until I had the outside edge of the foot the size that I wanted. 


Next, I removed the clay from the center.  I slowly worked until I felt the push pin that I'd pushed in from the  inside.  That left about a quarter of an inch of clay in the bottom of the bowl.  


After that, I did some cleaning up.  


Then I worked to trim the outside of the bowl.  I had to trim away some of the clay to make the curve look nice coming into the foot.  


The finished bowl. 


I am really happy with how this turned out and I enjoyed making it.  So it turns out that I am better at making bowls than I remembered.  Of course, now that I've said that out loud, the next time I try it won't go as well.

Friday, November 18, 2011

Recovery

It feels like last Saturday's Carolina Pottery Festival was months ago.  First of all, I need to say a BIG thanks to everyone who came out.  Of course, HUGE thanks to those who made purchases,  but even if you didn't, it was good to see you.

After being on my feet selling pottery all day, getting packed back up and loaded up in the car, and then unloading once I got home that evening, I was exhausted.  Then, of course, I woke up in the middle of the night thinking about all that needed doing to get the pottery unpacked and back on the shelves where I store it.  It is not normal to be up at 2 am unpacking boxes, but I did it.  I've learned that it is just better to get up and do whatever it is that is keeping me awake.  So Sunday was a strange day after being up half the night.

This week has been what I'd consider much closer to normal for me, so I've had a chance to rest a bit.  I even took a nap this afternoon!  I got back to work in the studio Thursday night.  Got started on replacing some of the pieces that I sold last weekend.  I started out by throwing a large bowl.  My intention was to make that part of one of the chip and dip sets like I made earlier this fall, but it was too pretty.  I couldn't smash it. Then I threw another large bowl, smashed the side of it, and then threw the small bowl that goes with it.  After that, I threw two bowls for a different kind of chip and dip set.

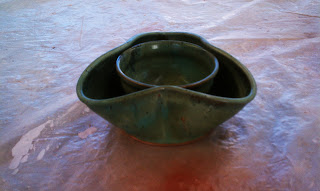
I went back to the studio on Friday morning.  I joined the bowls on the first chip and dip and then worked on the second one.  For this set, I cut off one side of one of the bowls and joined them.  (These pictures are actually from one I made some time ago.)  If you look at this from the top, it looks like two intersecting circles.  They are rather labor intensive, but I think they are really cool.  I wouldn't want to do it every day, but sometimes the challenge is fun.

Sunday, November 13, 2011

Can't Let Go

I did something this weekend that I'd not done before.  I had this cookie jar all packed up and took it to the pottery show on Saturday.  I unpacked it and then couldn't put it out for sale.  Yep, I put it back in the car and  took it home.  I guess I am not ready to let this go yet because I couldn't stand the thought of selling it.  I might have to keep it for myself.  I absolutely LOVE it.

This is a white clay called phoenix and the glaze is called Mexico Point Blue. This piece was fired in a gas kiln at reduction (where the amount of oxygen is reduced at certain points in the firing) probably at cone ten (real hot).  In an electric kiln, where there is no reduction, this clay and glaze combination results in a blue that looks a lot like Carolina blue.  I'm really not a big fan of that particular shade of blue.  At reduction, the clay body turns gray and the glaze ends up looking kind of faded out and antique.  

Our friend (and learned colleague) has sold his gas kiln, so this is the last piece that I will be able to get that looks like this.  Knowing that I'm not going to be able to reproduce it makes it really difficult to let go.  I'm going to have to give some serious thought to whether or not this needs to be in my kitchen permanently.

Friday, November 11, 2011

Pottery Festival Tomorrow

I spent today getting ready for the Carolina Pottery Festival.  It happens only once every 365 days and right now, I'm really glad.  I am TIRED.

It's been a very busy couple of weeks and today was really the first time I've been able to think much about getting ready.  I don't like to leave everything to the last minute, but sometimes there's no way to avoid it.  This morning, I packed up all the pottery, shelves, lights, and tables in the car.  It actually took all morning to get that done.  Then I spent the afternoon getting set up over at the Cleveland County Fairgrounds.  After standing up on the tile floor at home all morning and the concrete floor in my booth all afternoon, my legs and feet are really tired and a little bit sore.  (What's up with that?  I'm supposed to be a triathlete and fit.  I should NOT be so wimpy about this.)

I had some really great help in getting set up from my mom.  She is so much better at arranging things than I am.  She's also responsible for all the table drapes that I have.  So if my booth looks good, Mom gets the credit.  I just made the pots.  My good friend Athena also came over after work and helped me make sure that the new credit card reader was working properly.  I am very appreciative of all of their help.  They are also both really good company, so just having them around is fun.

I did get a nice surprise this afternoon.  I have a new booth space this year.  I have been moved to Dorton Hall--something that I've been hoping would happen for a couple of years.  The building is older, but the booth spaces are a little bit bigger.  The tables and shelves are all set up and there's enough room for a couple of chairs and a table for wrapping out of the way.  This is going to be a huge improvement.

I'm actually quite excited about tomorrow.  This show is such a good time.  I get to see lots of people and some of them even buy my pottery.  Honestly, I'm still kind of amazed that I can actually sell my work.  Grateful, pleased, honored, and amazed.  How the heck did I get here?  Tomorrow will be fun and I can't wait!  I just hope I sleep tonight.


Tuesday, November 8, 2011

Only 4 Days....

There are only 4 days before the BIGGEST POTTERY EVENT OF THE YEAR!  (Notice how I introduce things like the announcers on TV these days?)  The Carolina Pottery Festival is on Saturday, Nov 12 and will be open from 10 am to 4 pm.  There will be close to 100 potters showing and selling their work.  This is an excellent chance to see lots of pottery of all different styles and to take care of some early holiday shopping.

There was an excellent article in our local newspaper on Sunday about the local potters who will be selling their work at the Carolina Pottery Festival on Saturday, Nov 12.  (Click HERE to see the article.)  Be sure to scroll through all the pictures.  You'll definitely see some folks that you know.

Friday, October 28, 2011

Going Big Time

I am happy to announce that I am now able to accept credit card payments.

Thanks to my friend Athena Smith for sending me information on a couple of credit card APPs for the iPad.  I have set up an account with Square, downloaded the Square APP for both my iPad and my smart phone, and obtained the card reader.  All I need now is a customer with a credit card!

I would really love to try this out before the Carolina Pottery Festival in a couple weeks (eeek!  It's only 2 weeks away!) so that we can work on any possible problems.  I'm going to be kind of nervous until I've used it a time or two with no problems.


Sunday, October 16, 2011

More Vases

Back in the summer, I made some vases that are very different from anything I've made before.  I saw pieces that were something similar in a gallery in San Antonio, TX and thought I should give it a try.  Two of them were fired in the reduction fire a few weeks ago, and I was tickled with how they came out.  

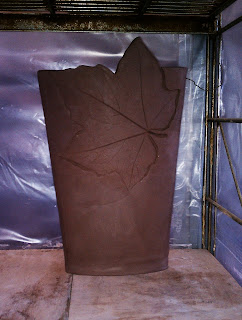
This weekend, I started working on some more.  I start with rolling out a slab, pressing a leaf into the clay, and cutting out the shape I need.  These vases have two sides.  Each side gets placed in an empty bucket to give it some curve as it dries to leather hard.  I've found that letting them sit overnight with a piece of plastic draped over the ends of the buckets works pretty well.  


Once the clay is dry enough, I take the slabs out of the buckets, stand them up, and join the edges.  The result is a tall, football shaped vase.  After the edges are joined, I attach a slab to the bottom.   When I'm sure that all the joints are sealed and smooth, it goes into the wet closet to dry for a few days.  

On the vase pictured here, I used a rubber leaf mold that we have in the studio.  I have also made some vases using leaves that I collected from the yard.  I'm still experimenting to see what works best.  

Monday, October 10, 2011

Leaf Me Alone

I managed to get the glaze fire done last week in time for us to have the pieces that we needed for the show in Lincoln County on Saturday.  To the right is my favorite of the things that were mine.  It is always exciting when something works out exactly like you plan.  That doesn't happen all that often for me.  The leaf on this tray is from one of the red bud trees in my yard.

Saturday's show was good.  I sold enough pottery to cover my expenses.  Although I really didn't make much money, my thinking is that if I make any at all, it is more than I would have if I'd stayed home.  It was only the second year of this particular show, and the crowd was better than last year.  I think they were buying more pottery too although I have no data to back that up.  Everyone is really nice, it is easy for me to get there, the timing is good for me, and the money raised from admission goes to help a school.  All this makes me agree to do it again next year.


I promised that I would share pictures of some of the new things that I've tried to make recently...and here they are.

On top is one of the nut bowls.  Ideally, the small bowl should be just wide enough at the top to kind of hang on the larger bowl.  This one didn't quite make it, but I think it will still work.

Below is one of the finished chip and dip sets.  Kind of cool looking I think.  I had two of these at the show on Saturday, and I still have two of them. Go figure.  I had sort of planned to make a few more, but I don't want to be stuck with a bunch of them if I'm the only person who thinks they are cool.

Monday, October 3, 2011

I will be going to the Appalachian Potters Market in December!

I got an email this morning informing me that I am IN the Appalachian Potters Market this year.  This is very cool and comes as quite a surprise to me.  I sent in an application just a few weeks ago because I'd heard that there were not as many potters on the waiting list this year.  I had no idea I'd actually make it in and thought that this way, at least I'd be on the mailing list with the possibility of getting in next year.  Turns out, I was first on the list and there was a cancellation this morning!  So on December 3, I will be at McDowell High School seeing pottery.  

In the studio last week, I was a little more productive than the week prior.  The clay tried to kick my butt, but I managed to make some cake pans on Thursday evening.  On Saturday, I trimmed the bottoms of the cake pans, ran to the vet to get some medicine for one of my horses, and loaded the kiln for a bisque fire.  This doesn't seem like all that much, but it is a significant improvement.  

Tradition Turners Pottery Festival is on Saturday and there are a couple of pieces need to be fired so that Ronnie and I have them to take with us.  This means that we needed to do a bisque fire over the weekend (DONE!) and follow that with a glaze fire the beginning of this week (HOPE to get done no later than Wednesday!).  I'm feeling some pressure about this.  Lucky for me, this week is Fall Break at CCC.  Even though I still need to work, I can be more flexible with my time so I can get the glazing done and the kiln loaded.  

In my next post, I should have some pictures to share again.  

Friday, September 23, 2011

Some Days...

There are some times that I can do no wrong in the studio.  It is cool to be in the "Zone" like that.  On those days, every ball of clay springs into the form that I want and it doesn't even feel like I'm working.  I have creative ideas and imagine becoming a professional potter because I am so good.

Thursday was not one of those days.

Friday, September 16, 2011

And Now For Something Completely Different

I declare the Taste of Home Cooking Show a success!  I sold a few pieces and got to see some Shelby High friends that I don't get to see often.  Not at all bad for a Thursday afternoon.  I am still amused when people see my work for the first time.  Some are amazed and say things like, "Wow, you are doing pottery for real.  I mean for real for real."  How am I supposed to respond to that??  "Um, no.  I'm just pretending to be a potter?"  Honestly it still feels very much like that.  I can honestly say that when I look at my display, part of me wonders who made all that stuff.  

I have to give Ronnie Blackburn credit for the notable quote of the day: "This pottery show stuff wouldn't be all that bad if it weren't for the setting up and taking down."  I'm sure I don't have that quite right, but his point was a good one.  Sitting there visiting with people and occasionally trading a piece of pottery for some money (or sometimes a jar of honey) is a very relaxing, pleasant way to spend a day.  It is the pack up, set up, take down, and haul out that is exhausting.  Do all that at the end of a full work day and you have one VERY tired potter/math teacher.  

When I manage to find the energy to actually unpack the pieces of pottery that I didn't sell, I will take a look and think about what I might need to make more of before the October show.  In the mean time, I'm working on nut bowls.  (I really don't know what else to call them.)  The small bowl will sit inside the large, altered bowl.  If the small bowl holds nuts that are still in the shell, folks can drop the shells into the large bowl as they eat. That is kind of confusing, so I will try to remember to post a picture of the finished product in a few weeks.    

(And yes, I did steal the title for this post from Monty Python...)

Sunday, September 11, 2011

Getting Ready for the Taste of Home Cooking Show

The show is Thursday, Sept 15.  I will have roughly an hour to get moved in and set up before the vendor area opens at 4pm, so I did a "test run" in the basement.  Since I've set it up once already, it will go faster when I do it for real.  I've tried to choose pieces to take that fit the cooking theme--things that could be used in the kitchen on the table.  Although we will only be open for business for about 2 hours, I really hope to sell some pottery.  It has been a long summer and I need to sell some pottery.

Saturday, September 10, 2011

What do you do when the bowl wants to sag?  The fan is helping the clay to dry while gravity helps with the sagging issue...

Friday, September 9, 2011

This week I am trying to make something new...a chip and dip.

I started Thursday night by throwing a wide, low, flat bottomed bowl and a small bowl.  Then I folded one side of the large bowl down flat.  That was really HARD to do the first time.  The actual folding was not difficult, but  it was hard to "smush" a side of a perfectly good bowl.  Then I put the pieces in the wet closet over night.

Friday about lunchtime, I returned to the studio to join the bowls.  I trimmed the bottom of the small bowl to clean it up a little bit and then scored the surfaces of both pieces where they will be attached. Then I added slip and pressed the pieces together.  I was worried about about trapping air in between the bowls since the joint is such a large area, so I really worked hard to press them together well.

So far, I am pleased with the result.  I would like the large bowl to be wider I think.  This will be something to work on.  Opening wide is not easy for me.

It will be interesting to see what other challenges I face before these are finished.  I imagine that sanding these is going to be fun. (NOT!)  Glazing will be interesting too with those tight spaces.

Friday, August 19, 2011

Reduction Fire Part 2

Well, we didn't get the results that we expected in that reduction fire a couple of weeks ago.  At the right is a picture of what we saw when we opened up the kiln.  Those dark pieces (look at the bottom row) are supposed to be a green ash glaze.  Needless to say, they are not green and that doesn't look like an ash glaze!

We also think that it got hotter than cone 6.  It was definitely hotter on the bottom than the top.  We can tell by looking at the cone packs on the bottom and top shelf.  The cones at the bottom melted more than the ones at the top.  Each pack has a cone that melts at cone 5 temperature, a cone that melts at cone 6 temp, and a cone that melts at cone 7 temperature from left to right.  The left cone should be completely over, the middle on should be bent, and the right one should be just barely bent.  These are way farther over than that indicating that the temperature was high.

Some of the pieces were a pleasant surprise here too.  The blue glaze that Allen and I used a lot of turned a very cool kind of tan color on some pieces.  Normally it ends up being kind of blue gray.  Check out the small lidded casseroles on the top shelf.  Those are Allen's and they look really good.  (They are kind of hard to see since they are in the shadows.)

On the second (from the top) shelf are other examples.  Those are mine, and one of those pieces is really blue and the other is more tan.  This is an excellent example of how two pieces with the same clay and the same glaze on the same shelf can come out looking different.  Stuff like this will drive a person crazy!

So what now?  We are experimenting with the pieces with the unfortunate "ash" glaze.  What can we dip them in to re-fire and make them prettier?  So far, there are several options that are an improvement over how they look right now.  Shoot!  Even re-fired at oxidation with no additional glaze they look better than they did coming right out of the gas kiln.

Sunday, August 7, 2011

Reduction Fire

Several of us who work in Allen Griffin's studio in Shelby (Allen Griffin, Vicki Halloran, Ronnie Blackburn, and I) have been working on pieces to fire in our friend--and learned colleague--Gene Young's gas kiln.  In a gas kiln, one has the opportunity to fire at reduction, which means that the oxygen is removed from the atmosphere in the kiln at certain points in the firing.  The glazes and clay bodies react differently than they do at oxidation, which is what we normally do in the electric kiln at the studio.

This project involved making the pieces, bisque firing them, glazing them with the glazes that generally give good results in this type of kiln, and then packing them carefully for transport.  On Friday, Allen, Ronnie, and I took everything over to Gene's to load the kiln.


Before we could load, we had to do some work on the kiln shelves to remove some old glaze so that our pieces wouldn't stick to the shelves.  Checking out the shelves is a normal step before every fire, but this time, the work was more involved than we anticipated.  At the left, Ronnie and Allen are working hard to try to finish before the rain started.


Once the shelves were fixed, we sorted all the pieces by size inside the shed to keep them out of the rain.

When you load a kiln, it is best to put pieces of the same height on a shelf.  The idea is to use the space in the kiln as efficiently as possible.  In other words, you try to cram as much stuff inside as possible without allowing any of the pieces to touch.

This kiln is deep enough for two shelves to fit front to back.  Starting with the bottom shelf in the back, we worked our way forward and up shelf by shelf.  

At the right, the kiln is loaded and ready to go.


In my next post, I will let you know how it went.  I hope to have some pictures of some really good looking pottery!
Sunday, July 24, 2011

Time Flies

These are the pieces that I've made for Cleveland Community College.  Again, I will spare you all the long story of how this has come to be.  I share this picture to prove that I CAN make several pieces that are pretty much the same shape and size.  I've learned that the trick to this is to use tools to help with sizing and shaping. If one uses the same putty knife to measure the inside diameter of the bottom (and to make it flat) and then the same rib to put the curve in the walls on each one, it is a lot easier.

I also selected three of my favorite glaze combinations.  Those glazes are pretty consistent, and I felt relatively confident that I'd get 18 little saucers that were the same colors and would not need a lot of touching up and re-firing.  In fact, out of these 18, only one had a couple of little rough spots that I ground down with a Dremel, touched up with the tan glaze, and put back on the "it-is-ready-to-be-fired" shelf in the studio.

Speaking of CCC, I've gone back to work now and am working to juggle everything that I WANT to do (pottery, train for triathlon, eat, rest) with everything that I HAVE to do (go to work every day, grocery shop, cook).  It's a challenge, but so far I'm doing ok.  Please don't misunderstand--I like my job and enjoy the people that I work with.  I actually look forward to going to work every day, but I had a wonderful summer and was not quite ready for it to be over.  One of my goals for this school year is to work LESS...Seems like I start each new school year with a similar goal.  Maybe this year I'll actually manage to do it!

Tuesday, June 28, 2011

One More Piece of Good News!

The "replacement lid" that I made to take the place of the one that I broke the handle off of came out of the bisque fire and is exactly the right size to fit the cannister.  I'll probably never be able to pull that off again, so I figured I better share now.

Back Home Again

After spending the better part of the last 3 weeks traveling (first to grade Advanced Placement Calculus exams in Kansas City, MO and then to the beach in Florida for a week), I am home and returned to the studio today.  While I was gone last week, there was a glaze fire.  I had several pieces in this one, so I brought home a big ole box of pottery with me today.   The picture below is all the things that are mine.
The sort of light green piece on the far left of the picture is the piece that I was working on in my last blog post.  I am pretty pleased by how this looks now that it is finished.  In addition to the sets of mugs that I made when I was working on pulling handles (and I need to do that again soon to see if I still can...), there are some new pieces.  I made some candle holders (left side in front of the "belly out" piece).  I'd never done candle holders before.  It was fun! 

I have a special order that I started working on today.  The small tan and green dish in the front of this picture (and the other 3 that are shaped the same way) were the test run for some pieces that I am making for Cleveland Community College.  That's a long story and I'll spare you the details for now.  I made 6 of those this morning.  I'll put handles on those and probably throw 6 more tomorrow sometime.  Then I figure I'll do 6 more in another day or so to fill the order for 15 pieces (with 3 extras just in case something happens).  Today's throwing was sandwiched between the early morning lifting and running and the mid day swim, so I was tired by the time I got home.  We'll see how much longer I'm able to keep up this pace.  

Friday, June 3, 2011

Belly Out


It is good to have a friend who is a journalist.  She remembers to take pictures when I don't.  Thanks to Megan (once again) for sending me a cool picture to include here. 


So what am I doing in this photo?  First of all, I feel compelled to point out that I am wearing shorts.  They just don't show much under my apron.  As for the pottery, this is that last couple of pounds of clay from a bag that had been open for a while.  It was kind of hard and difficult to work with, so I thought I'd just see what I could make it do.  

In this picture, I am using a stick to "belly out."  

From www.thefreedictionary.com   Verb1.belly out - swell out or bulge out 

I started with a cylinder and left the walls kind of thick.  I choked the top in to keep the opening small.  This was to be sure that I could close in the top when I was done.  Then, since the opening at the top was too small for my hand, I used a throwing stick to push the clay out while the wheel turned.  This stretches the clay and after a few passes creates a wide, round "belly" in the pot.  In this particular case, I wasn't able to stretch the clay very far.  I'd hoped to make something almost globe shaped, but the walls started to rupture.  I "saved' the pot by using a metal rib to compress the clay and fix the sides where the problems were beginning.  

Then, I choked the top in a little bit more and pulled that extra clay up to make sort of a spout at the top.  I  flared it out a little bit to make it prettier, and decided that I'd done what I could with that lump of clay.  The result is heavier than I'd like since I wasn't able to stretch out the belly as far as I'd hoped.  I will try to remember to take a picture tomorrow to show what the end piece looks like.  


Friday, May 27, 2011

Ah! Summer!

It is summer time now, so I am not good about staying in routines.  I think this probably helps balance out the rest of the year when I am scheduled every second of every day.  At least this is what I say to myself to justify my lack of direction, lack of discipline, and general laziness these days.  Riiiiight.

I have been in the studio working some (even though I have not been good about updating my blog).  The soup mugs that I made as a special request have been glaze fired and much to my surprise, the "red" glaze ended up being a very nice shade of brown.  NOT what we were looking for at all.  So I'm going to send them through another glaze fire to see if the color will change.  If not, oh well.  That's how it goes sometimes.

I've thrown a possible replacement for the cannister lid that self destructed the other week.  We shall see if it will fit after it is bisque fired.  Getting the size right is tricky when one of the pieces has already dried and fired once.

I've also made a number of other mugs.  I had someone ask about what mugs I had for sale not long ago and I realized that I really didn't have much.  So three sets of 4 mugs later, I will have some to look at!  (Well more like 2 sets of 4 and one set of 3 since I managed to poke a hole in the bottom of one....can we say too thin on the bottom?)  I'm experimenting with a new mug shape and continue to work on pulling handles.  The shape of a pulled handle I think works better with the new mug shape.  My husband Jeff stopped by one day while I was working on some of them and commented that the 3 mugs I had lined up looked like 3 Mile Island.  Those of you who are old enough to know what this means can now visualize what these mugs look like.

In other news, I am happy to report that I continue to not drive my car into the kiln that is sitting in my garage.  This is a good thing but I worry every time I park the car.  I still really want to use my new wheel.  If I get the guts to do it, I might just bring some clay home and do a little throwing here at the house.  A concern over the lack of pounding board (in other words, no place to work up clay) is causing me to pause.  Well, that and the fact that there is so much other work to do here.  It works so much better for me to go someplace else.  I am so easily distracted here.  There's the yard, the garden, the dog, the cats, the horses all clamoring for my attention when I am here.  Ok, so the dog mostly just sleeps nearby, but there is always tons that needs doing here.  Yes, I need to leave so that I can focus on pottery.

That reminds me.  I need to go let the horses out. They've probably finished their breakfast by now!

Friday, May 6, 2011

Disaster!

Sometimes bad things happen even when you are careful.  The lid on the largest of the 3 cannisters that I made a while back self destructed while I was getting it ready to glaze last night.

I must not have attached the handle on the top of that lid very well.  I had just dipped the lid in hot wax to coat the bottom edge (to keep glaze off the part that would be in contact with the shelf in the kiln when it is fired) and was holding it over the wax to drip when it let go.  SPLASH!   Into the wax went the lid.  It didn't break when it fell which is a good thing, but wax went everywhere.

Sometimes things just don't go the way I plan.  My first reaction is still to trash the offending piece, but I am learning (with Allen's help) to salvage things.  It is difficult to think about throwing away a piece that already has so many hours of time invested in it.

So I now must go to plan B on that cannister set.  First of all, the "broken" lid will need to be re-bisqued to remove the wax from the places I didn't want it.  Then I'll probably have to fire the handle separate from the lid and try to re-attach it afterward. This also means that I need to do something different with the glaze than I originally planned.  I have some time to consider that since I won't be glazing this until after the next bisque fire.

*SIGH*

Perhaps tomorrow will be a better day.

Sunday, May 1, 2011

Beautiful Weekend

This weekend was just about perfect.  Saturday was a good day to be in uptown Shelby.  With the Arts on the Square, the opening day of the Foothills Farmers Market, and the Merry Go Round Festival all happening, there were lots of people around.

I threw eight mugs in the morning and then let them sit for a while I strolled the court square.  Jeff and I visited with friends, admired some cool artwork, and ate some really good hot dogs.  Because the weather was so nice, by the time we got back to the studio, the mugs were dry enough to attach handles.  It isn't often that I can get 8 mugs done start to finish in the same day.

Sunday, April 24, 2011

Large Pressed Form Vase

This week's project is a special order for a large vase.  To get the size that I want, I am assembling this vase in three pieces.

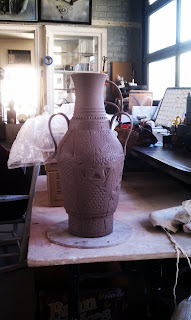
On the left in the picture above is the top of the vase.  This part was thrown.  The other two pieces, the center and bottom of the vase, are pressed forms.  To make a pressed form, I roll out a large slab, add texture, and then cut the slab into smaller pieces.  These small pieces are then pressed in to the form and allowed to dry.  I allow the seams to show and become part of the design.  Once all parts are leather hard, they are joined.  Handles are added last.  The assembled piece is pictured below.
The handles on this vase are pulled rather than cut from a slab, created from a coil, or extruded like I have done in the past.  Today was the first day that I have ever had any success pulling handles, and I am pleased to have managed to get two handles that match relatively well. 

Back in the Swing

It's always hard for me to get back into making pottery after I've had to take time off.  The problem with being a weekend potter is that anything that takes up time on weekends takes time away from pottery.  Earlier this month, I was out of town two weekends in a row.  The first to visit good friends that I don't get to see very often and the second for a math conference.  Both trips were good.  When I went back to the studio last week, I kind of wandered around a while before I figured out what it was I do there.

I finally got cranking on some soup mugs that I am making as a special order.  Little things like centering and opening are the first to go for me if I am not practicing regularly.  I managed to get some mugs done, but I wasn't really happy with them.  I had difficulty getting them to match.  It is amazing sometimes how I can take identically sized balls of clay and make mugs that vary so much in size and shape.  I will admit that I didn't notice the differences so much this weekend when I sanded them to get them ready for the bisque fire.  Maybe when they are fired and glazed, they will be ok.  Then again, I may decide that I have to start over and try again to get a set that match.

Lookie What I Bought!

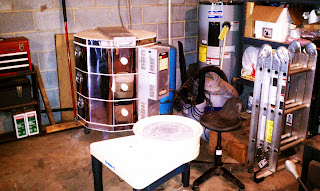
This is a picture of the equipment that I just bought.  I have my very own wheel and kiln now!  They will live in my garage since I have no studio space at home and no immediate plans to create such a space.  I have dreams for someday converting the barn into a studio, but that is a long way off.  There are horses who live out there and they aren't ready to move out yet.  

I wasn't really looking to make purchases like this right now, but the right opportunity presented itself. It is really funny how things work out sometimes.  We can chalk this whole experience up to the power of the internet and social networking.  It has been an amazing week and I am grateful to all the people who helped make this possible.  BIG thanks are due to Jeff, Allen, Bob, Mom and Dad, and even Jose!

Monday, April 4, 2011

Glazing Day Part 2

I was out of town last weekend, so there's not a lot to tell as far as pottery goes.  I did pick up the pieces that were fired the weekend before.  I was quite pleased with most of them and only one piece needs to be re-fired.  Pictures of some of the more interesting ones are on the right side of your screen.

Sunday, March 27, 2011

Glazing Day

It was glazing day on Saturday after a relatively late start.  I participated in the Camper Scamper 5K to benefit Camp Safe Haven first thing that morning.  (This also makes Saturday Racing Day, by the way.)

It was rainy which meant that things dried really slowing.  Patience was key for pieces that require two or more glazes.  It is important to allow the first glaze to dry before layering the other glazes.  Many of my pieces have more than one glaze, and I'm not particularly patient, so this was a little frustrating for me.

I waited until Sunday to load the kiln and get it started.  I wanted to be sure that everything was completely dry before I handled them much.  We should have some new things to take home in a few days.

Sunday, March 20, 2011

Trimming the Lid

In this photo, I am trimming the lid on one of the cannisters.  I am removing the extra clay where it was attached to the bat and shaping the lid so that it has a nice curve.  (Thanks to Megan for the picture!)

Cannisters Part 2


Lids are trimmed and handles are attached.  Now it's time to let them dry completely before they can be fired the first time.  The paper strips are so I can lift the lids off without using the handles.  Until they are bisque fired, handles are too fragile to use.

Friday, March 18, 2011

This Weekend's Project

I'm working on a set of cannisters this week.  The first step is to throw the cannisters and lids.  Lids are thrown upside down and they look a lot like bowls at this point. Getting this much done was Thursday evenings project.  (I was pretty pooped by the time I finished.) The pieces need to dry to the leather hard stage before any more can be done.  Saturday morning I'll be sure that each lid fits nicely before cutting them off the bats.  Then I'll trim them to get the shape that I want and will attach handles.

Sunday, March 13, 2011

Good Bye Treasures...

The Treasures of the Earth Pottery Show and Sale at the Cleveland County Arts Council is now over.  I went over Friday afternoon and packed up the pieces that didn't sell.  I had a pretty good show all things considered and am grateful to everyone who purchased a piece of Susan Jones Pottery.

Thank goodness I sold some work.  When I unpacked at home, I had trouble getting everything back on the shelves. The good news is that if you didn't have a chance to buy something while it was on display, there are still LOTS of pots to choose from.  Feel free to contact me if you need to do some shopping.  (I'd like to take this opportunity to remind everyone that Mother's Day is just around the corner.)

This week in the studio, I've been working on throwing and altering bowls.  I hope to have pictures to share in a few weeks when they are glazed and fired.  I'm having some difficulty getting the sizes right for what I have in mind.  We shall see how they turn out.  I also hand built a vase that might end up being relatively interesting.

I've enjoyed continuing to work with Megan.  She's coming along nicely despite the fact that one of our lessons this week was hijacked by our friendly neighborhood dentist/potter.  All kidding aside, I think she is benefiting from this "teaching by committee."  I am certainly grateful for input from others.  We all do things a little bit differently and this exposure to a number of throwing techniques is helping her find what works best for her.

Monday, March 7, 2011

Mugs!


Here are some mugs that I made this weekend.  
They'll be dry in a week or so and ready for the next bisque fire.  

Sunday, March 6, 2011

First Experience "Teaching" Pottery

This week, I've had the opportunity to do a little bit of teaching.  To be honest, I feel inadequate.  I've only been doing this myself for a few years.  But we had success!  My "student" got two lumps of clay reasonably centered and then pulled into something that might eventually be mugs.

I'm finding that this is good for me.  For one thing, it has reminded me how truly far I've come.  It is easy to forget the days that throwing a 1.5 pound mug took all morning.  I also believe that really thinking about what I do so that I can explain it to someone else will help me continue to improve my skills.

I've always said that I didn't really learn calculus until I started teaching it.  The same holds true for pottery!