You can often find me here

You can often find me here

Thursday, October 1, 2020

Susan Jones Pottery is on ETSY!

Check out my ETSY shop!  

https://www.etsy.com/shop/SusanJonesPottery


I'm sure there are things that I still need to fix, so if you see something that looks weird, please let me know.  There are only about a zillion things that need to be set up.  It's taken a while to get to this point, and I'm sure that I missed something.  Baby steps, right?  I won't know what doesn't work until I start selling there.  


Wednesday, September 23, 2020

So, How Are You Doing?


No, really.  How are you?  I have missed you.  


It has been months since I've updated this blog.  I'm sorry about that.  I suppose I've just been busy trying not to freak out about everything.  Making myself sit down at the computer to write was more than I could do for a long time.  When I don't communicate regularly, I don't know what to write about. That's where I am now I think.  

Things in the studio are OK.  I'm making pots and selling a few.  I'm teaching a few lessons.  We just wear masks so that we can work closely together.  All that is good.  


Actually my sales have been pretty good lately.  I am VERY grateful for that.  If you have bought something from me lately or commissioned work, THANK YOU.  You have kept me going, in more than one sense, during some very uncertain months.  You've helped pay the rent and utilities, and you've given me something to do when I wouldn't otherwise have known what to do.  


Like so many businesses, particularly people who make and sell crafts, I've had to do things quite a bit differently that I used to.  A lot of my sales have come from ONLINE sales and that is a very new thing for me.  I was nervous.  But I tried it.  Thus far, the only online sales that I've done have been as part of the Local Online Vendor Fair on Facebook.  My brilliant friend Anna put this together back in April as a way for craft makers to be able to sell their work since so many in person craft fairs had to be canceled.  For me, it has been very successful.  I'm grateful for the opportunity and the push to try it. 


We made the tough decision a week or so ago to cancel the Carolina Pottery Festival. This is the pottery show that is held the first Saturday in November in Shelby every year.  I hope that we will be able to have a virtual festival since we can't do the in person festival.  To put myself in a position to participate in a virtual festival, I've gotten started getting an ETSY shop set up.  Yes, Susan Jones Pottery will be available via ETSY soon.  Again, this is intimidating and I'm nervous.  But I've got good friends who are giving me good advice.  

That's all the news from here for now.  I could have done all this in a lot fewer words probably, but then you wouldn't have had to scroll through all these pictures of things with leaf impressions on them.  Good by until next time, friends.  

Sunday, May 10, 2020

Wow, This Is Hard

Yesterday, Saturday, May 9, I put the open signs out at A Griffin Pottery for the first time since early March.  

I have not been OPEN in weeks.  Yes, I've had some sales, but having someone stop in to pick up a purchase they made online or agreeing to meet a friend so they could pick out something for Mother's Day is very different from opening the door to any person who wanted to walk in.  

It was scary.  I am doing my very best to follow all the guidelines about keeping myself and my customers safe.  
Wearing a mask.
(I hate wearing a mask!)

Posting signs.

Making hand sanitizer available and encouraging people to use it.
(I used to HATE hand sanitizer.  Now, it is comforting. What a weird world.)

I also washed my hands with soap A LOT and cleaned all the high touch surfaces in the gallery A LOT.  All this and I was still very uncomfortable with people just coming in.  

Earlier this week, I finally got around to grinding kiln shelves.  Sure enough, I hate that chore!

It is messy, messy, messy!

And I look like a total freak.

When I'm not doing nasty, dirty clean up chores, I have started picking up leaves again.  
Yay!  Leaves!

Yay! Leaf platter!

Before grinding the shelves, I ran a glaze fire.
Lots of nice things in this load.

After I worked on the shelves, I fired a bisque.

Currently, there is a glaze fire cooling and probably enough for a second glaze fire this week.  I've been working hard to get ready for my next online sales day on May 17.  

Monday, April 27, 2020

The Week In Review

This time last week, I was ending up my day as the featured artist on the Local Online Vendor Fair Facebook group.  I am amazed at how well that went! THANK YOU to everyone who commented on or reacted to my pictures. HUGE thank you to those of you who made purchases.  Your love and support means the world to me.  I honestly don't have the words to adequately thank you. 

Last Monday went so well, that I've asked for a day in May to show off my work again.  May 17 is my day, so brace yourselves! 

I plan to have some new things to share as well as some of the other pieces that I didn't have time to show you last week.  New pieces?  Why yes!  I am firing the kiln as we speak.  This is a bisque fire, so frantic glazing and a second firing will follow in the days to come. 

So what did I do after I finished packing pots up for pick up and delivery?  Well, I made a bunch of bacon cookers.  I sold the 2 that I had on Monday.  Sometimes that is all it takes to get my rear in gear.  I made 6 more cookers. 
I am aware that there are only 5 in this picture.

There were also a few mugs, some cake plates, a casserole dish, and a couple of apple bakers.  For some reason I didn't get pictures of those.  Maybe because I'm trying to finish up the last of the clay that I got back in January.  Carolina Clay Connection was out of my favorite speckled brownstone clay and I've been making due with other clay that I don't like so much.  I was down to my last box when I heard that Carolina Clay was taking emailed orders for curbside pick up now.  Hallelujah!  (Hallelujah also for spell check because I couldn't spell hallelujah on my own if my life depended on it.) 

My studio assistant and I made the trip to Charlotte today.  

Dixie supervises the loading of the boxes.
"Make sure you spread them out.  We don't want all that weight in one place back there."

Even though I knew how to get home, Dixie felt that she needed to help navigate.
"Turn left at this stop sign."

Once we hit interstate, she was out.  Is that comfortable, Dixie doggy?
"Zzzzzzz...."

I have new clay!

And new glaze!

And lots of work to do!

Still using up the last of the old, not as favorite clay, I started on some new pasta bowls. I had a total of 10 pasta bowls last week and they all sold too.  These are not easy to make, but I'm getting better I think.  

I got these 3 made relatively quickly even though the clay was kind of hard.

Then the 4th bowl did this. Twice.  

It took 3 freaking tries to get that 4th bowl thrown.  I did finally get it, so I have 4 bowls to trim tomorrow.  I also plan to make 4 more bowls.  We shall see how it goes.  I also have glazes to process and that is always a lot of fun.


Thursday, April 16, 2020

Slabs, Slabs, and More Slabs

I have some projects at the studio that need finishing.  No, not the deep cleaning and kiln shelf grinding that I have mentioned previously.  Pottery projects.  Commission work that folks asked me to do before the world shut down.  

I ran a bisque fire late last week and then glazed my work.  I hoped that I would have enough to justify running a glaze fire.  Well, I didn't.  There's maybe enough for roughly a third of the space in the kiln.  That's just not enough.  

So...change of plans.  Now I am trying to get enough made to run another bisque fire as soon as possible.  Because I'm trying to fill up the space with just MY work, I decided that I would make some big things.  Big, odd shaped things normally drive me nuts when I'm loading the kiln.  But now they are perfect.  

My first thought was to do a couple large, drape bowls like this one.


These start with a large slab.  I cut out a circle and add texture to both sides.  

Next, I drape the slab over a big ball.


A little work to change how the clay "drapes" over the ball.

Add some feet.

Then make an attempt to level them.

After that dries for a day or so, I'll work to smooth off the edges of the clay.  When it is firm leather hard, I'll lift it off the ball and flip it over to finish drying sitting on the feet.  

Note: if you are wondering about the texture in these pictures, you are not nuts.  These are two different pieces.  The first one I made had mostly geometric shapes and the second one is more flower and leaf shapes.  

The other night, Dixie and I watched a new video that Bill Van Gilder put on YouTube.  (You too can watch at  https://youtu.be/bkfRNe24cHw if you are interested.)  To be fair, Dixie mostly slept through it, but I got all excited to try something new.    

These big bowls also start with a slab.
I made a paper template and used it to cut out the shape.

I have two of these bowl shaped hump molds.  They worked out perfectly for this.

Drape the clay over the bowl.

Carefully press it down.  A clean paint roller works great for this. In a perfect world, I'd have a 4 inch roller on that frame.  In case you have not yet noticed, my world is far, far from perfect.  This works ok and does not involve a trip to Lowe's.

After it dried to leather hard, I lifted the clay off the mold.

Used a sure form rasp to trim the edges.


Cut a hole in one end for a handle.

I added feet to some of them.  I only added 2 feet to lift one side of the bowl.

All of these have a different texture on the inside.  So far, I've made four.  Two have feet and two do not.  The non-footed bowls have a small flattened bottom so they don't just roll all over the place.  The slabs started out about 14 inches from point to point. When they are finished, I think they will be between 12 and 13 inches.  They are fun to make, and I think they are going to be really cool when they are finished.  I hope they are things that people would want to have in their homes and/or give as gifts.  In a few weeks, I hope I'll have pictures of finished pieces.  

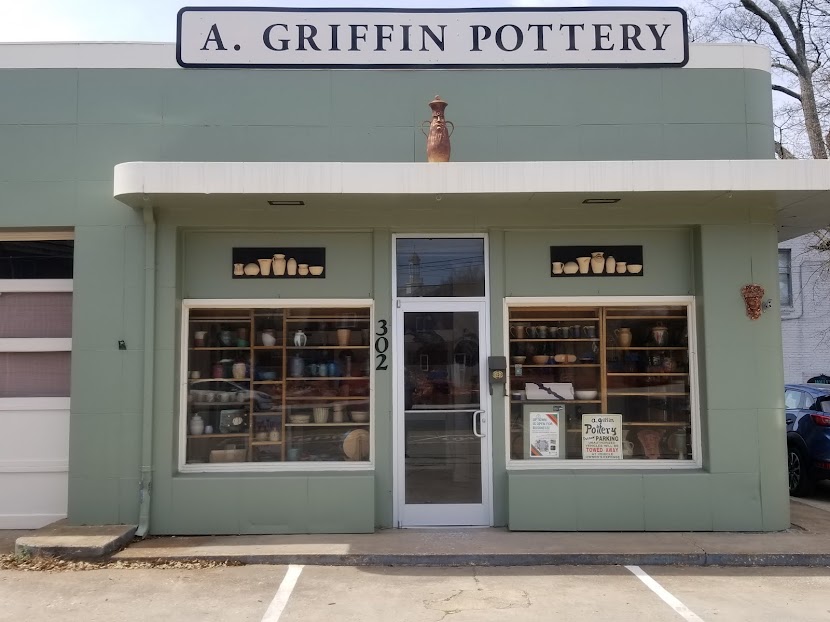
Speaking of pictures, I am working on getting pictures of a lot of the finished work that I have so that I can share them online for folks to shop.  I have work at Buffalo Creek Gallery, in the gallery at A Griffin Pottery, and some at my house because there's no more room to store things at the studio, so the picture taking is not as easy as it would be if everything were in one place.  On Monday, April 20 I will be using FaceBook to share lots of this. I will be the featured artist on the Local Online Vendor Fair group.  I will also put things on the A Griffin Pottery FaceBook page and on Instagram.  Stay tuned for more information.  I am still turning ideas over in my head about how to best handle this.  How should I organize what I'm showing?  If someone does want to buy something, I will offer free local delivery,  pick up at the studio (where I bring your items to you as you wait in your car), or I will ship for folks who are out of town (as long as you do not mind paying shipping costs).  It is a lot to get my head wrapped around.  This is one of the reasons that I have not gotten moving on this faster.  

Monday, April 13, 2020

And Now For Something Completely Different

April 13 - The studio has been closed for two weeks now I think.  It's weird.  I go every couple of days to check on things.  I'll confess that I do a little clay work while I'm there.  I'm the only one there, so my being in the studio versus at home makes little difference.  I'm still struggling with motivation and focus, so I don't do a whole lot while I'm there.  Plus being Uptown right now feels weird.  It is way too quiet.

I do, however, recognize how lucky I am to have a safe place that I can go during this difficult time.  The days that I have stayed at home are good days.  I have enjoyed working in the yard when it is pretty.  I've given myself permission to be lazy and spend a couple of days napping and being a slug while I do absolutely nothing.  But it is also REALLY nice to be able to jump in the car with Dixie and go to town.  Here are some of the yard pretties...

These azaleas are so pretty this year!

Blue bells and azaleas.

Dixie is finally getting more comfortable being outside.

It's been so fun to watch her snuffle around.  She LOVES monkey grass.
(Note: Dixie is inside right now whining to go outside.  Jeff caught her trying to knock the wood in the wood rack over.  We think a mouse or chipmunk or something must have run in there. In an attempt to not have our sweetie crushed by firewood, we are making her stay inside. We are so mean!)

When I initially closed the studio, I thought that I would use some of the time to do some deep cleaning.  Shop vac the heck out of things and maybe even mop.  I need to grind the kiln shelves and start over with kiln wash.  Know how much of this I've done?  NOTHING. NADA. ZERO. It turns out, that I do not like to clean.  It's not fun.  Oh well.  It's a pottery studio.  If I cleaned it, it would just get dirty again. 


I talked about my new apron a few weeks ago.  Here is a side by side shot of the new and the old.  See how much longer the new one is?  Well, after I complained about that here, I got an email from my friend Gloria offering to fix my apron.  She stopped by one afternoon, picked up the two, and was back in maybe an hour with my newly shortened new apron.  She also shortened the ties for me so that they tie in the back.  Gloria is such a nice person!  Her daughter Stephanie is too.  Thank you!

I've been eating a lot of eggs lately. These are my favorite.

It is a good thing they are not available all year round because I can eat a whole bag of these in a day.  Easy.  Allen liked them too.  He and I polished off a few bags together over the years.  He'd be on once side of the table and I'd be on the other.  Both of us working.  Bag of Cadbury's in the middle.  Good times. 

I've not shared much pottery today.  I'm working on a few things now that I will share.  I've got to get a few more pictures of next steps before I can explain what I've been working on.  Be on the lookout for that soon.  

Before I go, one more thing.  Pictured below is my friend David Bryson.  David teaches at Shelby High School.  When they transitioned to teaching remotely, he put a piece of shower board on the side of his barn, propped his phone up in the bed of his truck, and proceeded to record an AP Government and Economics lesson.  Riker the dog totally stole the show.  One of his students sent him this screen shot.  I can not stop laughing!  He has since banished Riker from the classroom and that makes me, and possibly his students, a little sad.  


Stay safe, my friends.  If possible, enjoy life like Riker does.

Monday, April 6, 2020

I Can't Even See My Comfort Zone Anymore

I'm so far out of my comfort zone, I can't even see it anymore.  Good gracious! 

A Griffin Pottery is now on Instagram!

You will find me at @agriffinpottery

I must warn you.  I have no idea what I am doing.  Maybe I shouldn't tell you that.  But there.  I did.  It's out there.  Some of my friends are trying to assist from afar by making suggestions and such.  I really do appreciate the input from folks who have more experience. 

I know I've got to start somewhere.  Baby steps and all that, right?  So far, I can kind of almost post a picture.  Sometimes those pictures end up in my "story", but sometimes they don't.  I haven't figured out what I do that makes that happen sometimes and sometimes not.  And what the heck is my story anyway?

I think my main problem is between my ears.  (Stop it.  I know that is where most of my issues come from.  You don't really need to tell me.)  I feel pressure to get this up and running so that I can sell some pottery this month.  I have friends and family who have busted their fannies shifting their small businesses online.  Yoga studios and fitness centers are doing virtual classes online and I can't figure out how to get a stupid picture of a pot on Instagram. 

Baby steps.  Take some pictures.  They don't have to be GREAT pictures, right?  Post them with a short description and a price. Maybe some body will want to make a purchase.  Then I can figure out how to take an online payment.  Gah! Another thing to learn. 

Soup bowl - $18 each - 4 available

Mugs in red and green - $18 each - 4 available

Covered butter dish - $40 - one available

Textured mugs - $18 each - 2 available 

Coffee pour over in turquoise - $16 each - 2 available

Turquoise mug - $18 each - 6 available

Pour over set - $32 for the set

Stay tuned...


Tuesday, March 24, 2020

Working With Slabs

Here's my latest slab creation.

I get regular emails from Ceramic Arts Network.  Sometimes there are deals on books, sometimes video clips showing helpful how-to's, and sometimes excerpts from articles from publications like Pottery Making Illustrated.  Yesterday's email contained directions to make a tray like this one - all from a single slab of clay.  

I tried it first using an oval pattern that I cut out of newspaper.  It was OK.  Just OK.  I do not love it.


I sure learned a lot though.  Often times, attempt #1 is where I figure out what not to do.  First of all, don't waste time making a paper template when there is a perfectly good oval shaped GR Pottery Form in the studio.  (Use this link to learn more about GR Pottery Forms.)  It's a much nicer shape than what I drew and made a much nicer tray.  Secondly, remember to put the texture in the handles BEFORE lifting them off the table or ware board.  Duh.  The last thing that I learned is that the handles don't need to curve too much.  

After I taught my regular Monday afternoon pottery lesson (from a safe distance across the studio), I made tray number 2.  Here's how it went:

I cut out the oval and transferred it to a newspaper line ware board.  Using a 2 by 4 (because it is what I had), I marked two lines separating the bottom of the tray from the 2 sides.  Then I added the texture to the sides.

Next cut along the lines about 1.5 to 2 inches from the ends.  The center part between those cuts is going to make the handles, so add texture.  Score and slip the four triangular shaped pieces.  Lift the sides off the board.  I used a small piece of wood (thanks, Ronnie) to get a nice, consistent, straight fold along the line I marked.  

Lift the handles off the ware board and fold the triangles behind the handle.  I didn't get a picture of the end at this step, but think about wrapping a gift.  The points of the triangles should either just meet in the center of the handle or should slightly overlap.  Press firmly. 

Curve the handles out.  Not too much.  I fluted the sides too.  This is optional but I like it.  My clay was really soft, so I ended up distorting the sides a little bit as I brought them up.  The fluting camouflages that somewhat and if the piece warps any as it dries or is fired, it will be less noticeable.  

I added 4 small clay "buttons".  Two on the outside of the tray where the triangles of clay come together under the handles and two on the handles at the base of the texture. I used a small stamp (thank you, Gail) to press the buttons to make sure they were attached securely.  

This project is going in my mental file of things to consider for future "clay classes."  It was relatively easy and quick.  I believe that even folks with no experience working with clay could do this with direction and a little assistance.  

Here's another project that is probably going in that same file.  

I didn't get any pictures of the process here, but it is something that I think I could make work for a group.  This takes a slab and some coils.  I rolled the coils by hand for this, but I would definitely use the extruder if I needed enough coils for a group. I still struggle with coils most of the time. 

What I think it really cool about this is that it can be any shape you can imagine.  I like ovals, but squares, rectangles, or circles would all work.  Cut the slab the shape desired.  If you want to put some texture on the rim of the slab, do that and then flip it over so that the texture is down.  Arrange the coil about an inch to inch and a half in from the edge.  Score and slip it and press it down. At this point, flip the piece over so that the coil is under the slab.  If  you added texture, it should be up now.  Using a sponge, press the slab down so that the coil on the bottom defines the "inside" of the tray.  Flute the edges and add handles if you want.  Handles are definitely optional.  

Come to think of it, this idea came from a video from Ceramic Arts Network too.  I watched it years ago and make these free form trays periodically.