You can often find me here

You can often find me here

Sunday, February 16, 2020

Hands On

I've been thinking about hands a lot recently.  I'm not sure why.  Maybe because mine have started to hurt more recently.  Maybe because I recognized a hand in a picture in a magazine this week.  Maybe because I took some pictures of my students hands while they were working during their last couple of lessons.  I'll share some of them in a bit.
This is a pot that I made years ago.  

Allen was still teaching at Gaston College at the time and offered to take a few of my pieces and raku fire them.  The finger prints in this glaze are his.  I love this piece because of them.  It's broken at the top, but I don't care.  I keep it because of the finger prints.

Those of you who have visited my studio know there are these crazy pieces of art on the wall above the door between the gallery and studio spaces.  They were class projects from when Allen taught at Ashbrook High School and are made up almost entirely of trash.  Students gathered things that were being thrown away, arranged them, and then spray painted them so that they were monochromatic.  A couple of those pieces have plaster casts of hands and one even has a face in it.  I love the hands though.  One pair is Allen's son Adam - at least that is what Adam has told me.  The other pair is most definitely Allen's.  I recognize them.  I watched them mold clay into beautiful pieces of art too many times to count.  When I look up at them, I am reminded of how many times Allen had to reach in a save something I was working on during my first lessons.  When I struggled, he could just fix it. It looked so easy when he did it too.  

From time to time over the past few months, I've found myself reaching in to save a piece that might otherwise not make it.  I try not to do too much of that because when I fix it, the student doesn't learn what to do.  I usually remember to ask permission first, but I almost always feel a little guilty that I took the easy way out.  It is so much easier to fix things myself than to try to explain in words what needs to happen.  It's like giving a calculus student the correct answer to a problem instead of helping them figure out what to do to solve the problem themselves. 

My pottery students continue to do well and I find that I enjoy teaching them.  I wasn't sure that I would.  I got so burned out on teaching the last few years that I worked, that I was not sure that I wanted to try to teach ANYTHING again.  But I'm really having fun!  Part of that is that they are neat people and I enjoy being around them.  Part of it is that I like sharing pottery.  After 28 years of teaching math and fighting that "I hate math" mentality day after day, it is refreshing to teach something that my students WANT to learn.  Now, before you get all concerned or offended, I did have have numerous students who enjoyed math over the years.  Some of them may even be reading this blog.  Maybe.  However, we all know that far more people go out of their way to share how much they hate math or how they just weren't good at it than will go on at length about much fun they had in their trig or calculus class.  

So, my pottery students....
Centering. Centering. Centering.
We all LOVE centering!
(Also, how do you have a nice manicure?)

Pull up...not out and no "ta-dahs".

For a bowl, out is ok.
NICE bowl, by the way.

While we are talking about hands, I have to share this - my dad made the March issue of Our State Magazine.
This picture is on page 77.  No, Daddy doesn't play fiddle.

There's an article about cool places to get coffee and/or doughnuts in North Carolina.  The spot in this photo is Tate Street Coffee in Greensboro.  Not only is it a cool coffee spot (no doughnuts that I can tell), but there's music too.  Judging by the picture, there must be at least one Guiness tap too.  The Thursday night Jazz Jam is a regular draw for music professors and students from UNC Greensboro and there's a great Irish music session on Sunday afternoons.  My dad plays the bodhran and is a regular on Sunday afternoons.  That's his right hand holding his tipper and left knee.  (The bodhran is an Irish drum.  Here's a link to more information so that you know I'm not making stuff up.)

Jeff and I just subscribed to Our State.  The March issue arrived on Friday and is the first one we've received.  I like coffee and doughnuts a lot, so I enjoyed the article. It started with Krispy Kreme in Winston-Salem which holds a special place in my heart.  The doughnuts are just better there than any other KK, but I digress.   When I got to this page, I thought, "Cool that Tate Street got included.  I really need to go get a coffee there sometime.  Hey wait a minute.  Is that Dad's hand?  Holy Cow!"  Actually I may have used a different word.  Showed the picture to Jeff who wasn't as sure I as I was.  Sent it to my sister Carol who also wasn't sure.  When Dad finally answered my text, he confirmed my suspicions.  Way cool.

Our State Magazine is a really good magazine.  We recommend it.  

Sunday, February 9, 2020

Once Upon A Time

Once upon a time, I made a big pot.


Big as in over 25 pounds of clay not counting handles and lid.  

Melissa Kniceley and Hal Dedmond came over to my studio the last Wednesday of January and we had an absolute blast.  Melissa makes big pots like this all the time and agreed to show Hal and me the process.  The piece in the picture above is what I ended up with.  It's far from perfect, but I can stand it for my first ever effort on something this size. Hal and Melissa, both of whom are significantly more skilled and talented than am I, made really nice pieces that I can't wait to see finished.  

So, how does this work?  Lots of clay, some fire, several cookies, and lots of hours of work is how.  Note: cookies make everything better and should be a required ingredient to all big projects.

I started with about 5.5 or 6 pounds of clay for the bottom.  That's the biggest that I can comfortably center. Then Melissa showed me how to use a propane torch to dry the clay so that it would support the weight of the large clay coils.  We started with this small torch.  With the piece turning on the wheel, I kept the fire on the clay until it was smoking and a good leather hard.  

The next step is to roll out a big coil, score the top edge of the pot and the coil, add a little bit of water, and attach the soft clay to the leather hard pot.  In the picture above, Melissa is showing Hal how to attach the coil to his pot. 

Here's my piece with a coil attached.  Once the coil is firmly attached, then you pull the clay up extending the walls.  

This is what I had several coils later.  After pulling the clay up as far as it would go each time, I had to trim the rim to make it even.  Less trimming would probably be necessary if I could roll out a coil worth a darn.  I struggle with that, so I just trimmed off the uneven clay after each coil.

After trimming the rim, add fire.  As you can tell, after the first couple of coils, I switched from little fire to big fire.  Big fire was a little scary, but is AWESOME!!  Once I got the hang of it, I became much less concerned that I was going to ignite my hair and drying the clay moved along much faster.


Fire on the inside of the pot and the outside of the pot - all while the wheel is slowing turning.  I wish I had taken some video so you could hear the fire as well as see it.  So. Much. Fun. Holding the torch with one hand and operating my phone with the other hand was a little tough to do, so a video would have been so shaky that it would have given us all motion sickness.  Still shots are better.

Hal working the big fire and Melissa adding a coil.

Melissa working the big fire and Hal working on the shape of his pot.

More of same.  Aren't my friends photogenic?  And talented?  Seriously, I was a few steps behind all day because I wanted to watch them work.  I love to watch other potters do what they do.

Thanks to Melissa for taking photo.
Things that I learned:
  1. I should have moved to the lower wheel before I added a lot of clay.  Instead, I moved what I was working on once it got so tall that I couldn't comfortably pull any higher.  It warped and I had to work hard to try to get it back roundish so that I could finish it. 
  2. Getting wide is easier than getting narrow. My piece ended up a lot larger than I originally had in mind because I let it get too wide before I started working to bring it back in.  
  3. I need a propane torch.  Little fire would be a very handy tool to have on hand on the regular.  Big fire is fun, but at this point, not necessary. Maybe.
  4. I still suck at rolling coils. 
  5. When adding handles the next day, remember that the clay is dryer than you are used to it being.  Score and slip BOTH ends of the handle (I usually can get away with only doing this to the top of the handle) and then wrap it up and let it dry slow.  I put three handles on this bad boy and so far, two of them have come loose at the bottom. The first one I fixed and the second one I'm still working on fixing.  Fingers crossed that I can reattach it.
  6. I will need to do this again soon and try to correct all the rookie mistakes that I made.
  7. After 8 hours of working on the same piece, I will hate everything about it.  True story.  It happened.  The next day I felt better though.  
If I can solve the problem of the unattaching handles, I will have to fire this big boy.  Oh boy.  Glazing is not going to be fun.  What was I thinking?  

Friday, January 17, 2020

"It's Been A Good Week"

On Monday I registered for a two week long workshop at Penland School of Craft.  Going to Penland has been a dream for a while now and I've been saving for years.  I am so excited!!  

This is the time of year that the summer starts taking shape.  Our family settles on a date and location for our family beach trip. It's normally this week that invitations to the Advanced Placement Reading go out.  We make beach plans usually before I know if I'm going to be grading AP Exams, but I always plan with the hope that I'll get to go to what my friends and I have come to refer to as "Math Camp".  This year, the family beach trip got pushed to late July instead of the third week of June (immediately after the Reading) due to some other family obligations.  

When the Penland catalog came to the house last weekend, I found the workshop that I thought I wanted to try to get into.  Checked the dates - June 21 to July 3.  Hmmmm, it doesn't conflict with vacation and would work even if I got an invitation to grade AP.  Perfect!  The next hurdle would be to actually get IN the workshop.  Registration opened at noon on Jan 13.  I was right there at my computer at noon working on registering. As were a bunch of other people...the website was SLOW.  After about 45 minutes, I had confirmation emails regarding my registration and payment of my deposit!  It turns out that I was doubly lucky.  The website crashed twice and the Penland folks suspended workshop registrations until Wed, Jan 15 while they tried to fix the issues.  BUT I got in before all that.  Wow.  

Then on Wednesday, I received my invitation to grade AP Exams!  So I'll leave on June 10 and will get back home on June 18.  I'll switch gears from math geek to crafty artist person.  Then I head up to Spruce Pine, NC for two weeks of pottery-ing.  Cool.  

In addition to all this excitement, I taught Nikki a lesson on Monday afternoon.  She is doing great.  Every week, I see improvement.  

The kiln has been not acting quite right the last few firings, so the Kiln Doctor came to take a look on Wednesday afternoon.  We easily have enough work ready for both a bisque fire and a glaze fire. 

The verdict was that we need new elements.  He said it was ok to bisque fire, but not to try a glaze fire.  OK.  I hope that it will work out for him to come back with the new parts next week. The sooner the better.  I've got a show that opens the first week of February.  Must fire pottery!  

Meanwhile, I've been cranking out stuff.  The first part of the week it rained.  A LOT.  It was a struggle to get things dry enough to finish them.  I made 4 cake plates on Tuesday. 
They sat on the shelf uncovered until Thursday before I could trim them.  I expected them to be dry enough to trim on Wednesday.  

Wednesday, I made the parts to a set of canisters.  
I was able to put on handles Thursday afternoon, but the lids weren't dry enough to work on until Friday morning.  


Sunday, January 12, 2020

And Some Other Things

How can I make a bowl this shape?  
Thanks to Ron Philbeck once again for helping me figure out a pottery "problem".

Obviously, start by throwing a bowl.  But then what?  It needs to be altered and needs to have a foot trimmed.  Altering the rim has to happen when the clay is wet.  Trimming the foot has to happen at the leather hard stage. If I alter the rim, it won't sit flat on the trimming bat.  

Solution?  Make a chuck!

Alter the rim right after throwing the bowl. Then when it is dried to leather hard, invert the bowl on the chuck to trim the foot.
Genius!

Next up - a lid for something that is not round.
Um, how?
I threw the sides, let them dry to leather hard, and attached to the slab bottom.  I have done this before. This time though, I cut a gallery in the rim to hold the lid.

The lid is also a slab.  Using a big sponge to give some support in the middle (the one on the bottom in this picture), I let the slab kind of sink down in the casserole.  After it firmed up enough to hold its shape while I handled it, I flipped it over and then trimmed it to fit the shape of the dish.  This gave the lid some curve.  The second sponge is there to help it keep the curve while it dried.

This piece is still drying, so I still don't know how it is going to turn out.  Fingers crossed for no cracks and no warping.

I'm working on "not round" lids because I've had a request for a 9 by 12 inch casserole dish with a lid.  That is a challenge on two levels for me. First is the lid and second is the size.  

This is a rectangular piece that might end up approximately 9 by 12.  It is still a guessing game for me to try to get finished pieces of a particular size.  If the size does come out right and if the lid on the oval piece above works out ok, I'll see if I can put the two together.  
Stay tuned.


When Pottery and Geometry Meet

I have to start with a picture of the finished project since the first picture of the post is what gets shared on Facebook. 

This project was fun.  It started with someone that I did not know asking for help finding a potter who could make the pot in the picture below.
We have a number of mutual friends who put us in touch.  I was honest that I didn't know if I'd be able to make something similar, but that I would really like to give it a try.

I love it when I try something new....and it works!  Here are some pictures that I took of the process. 

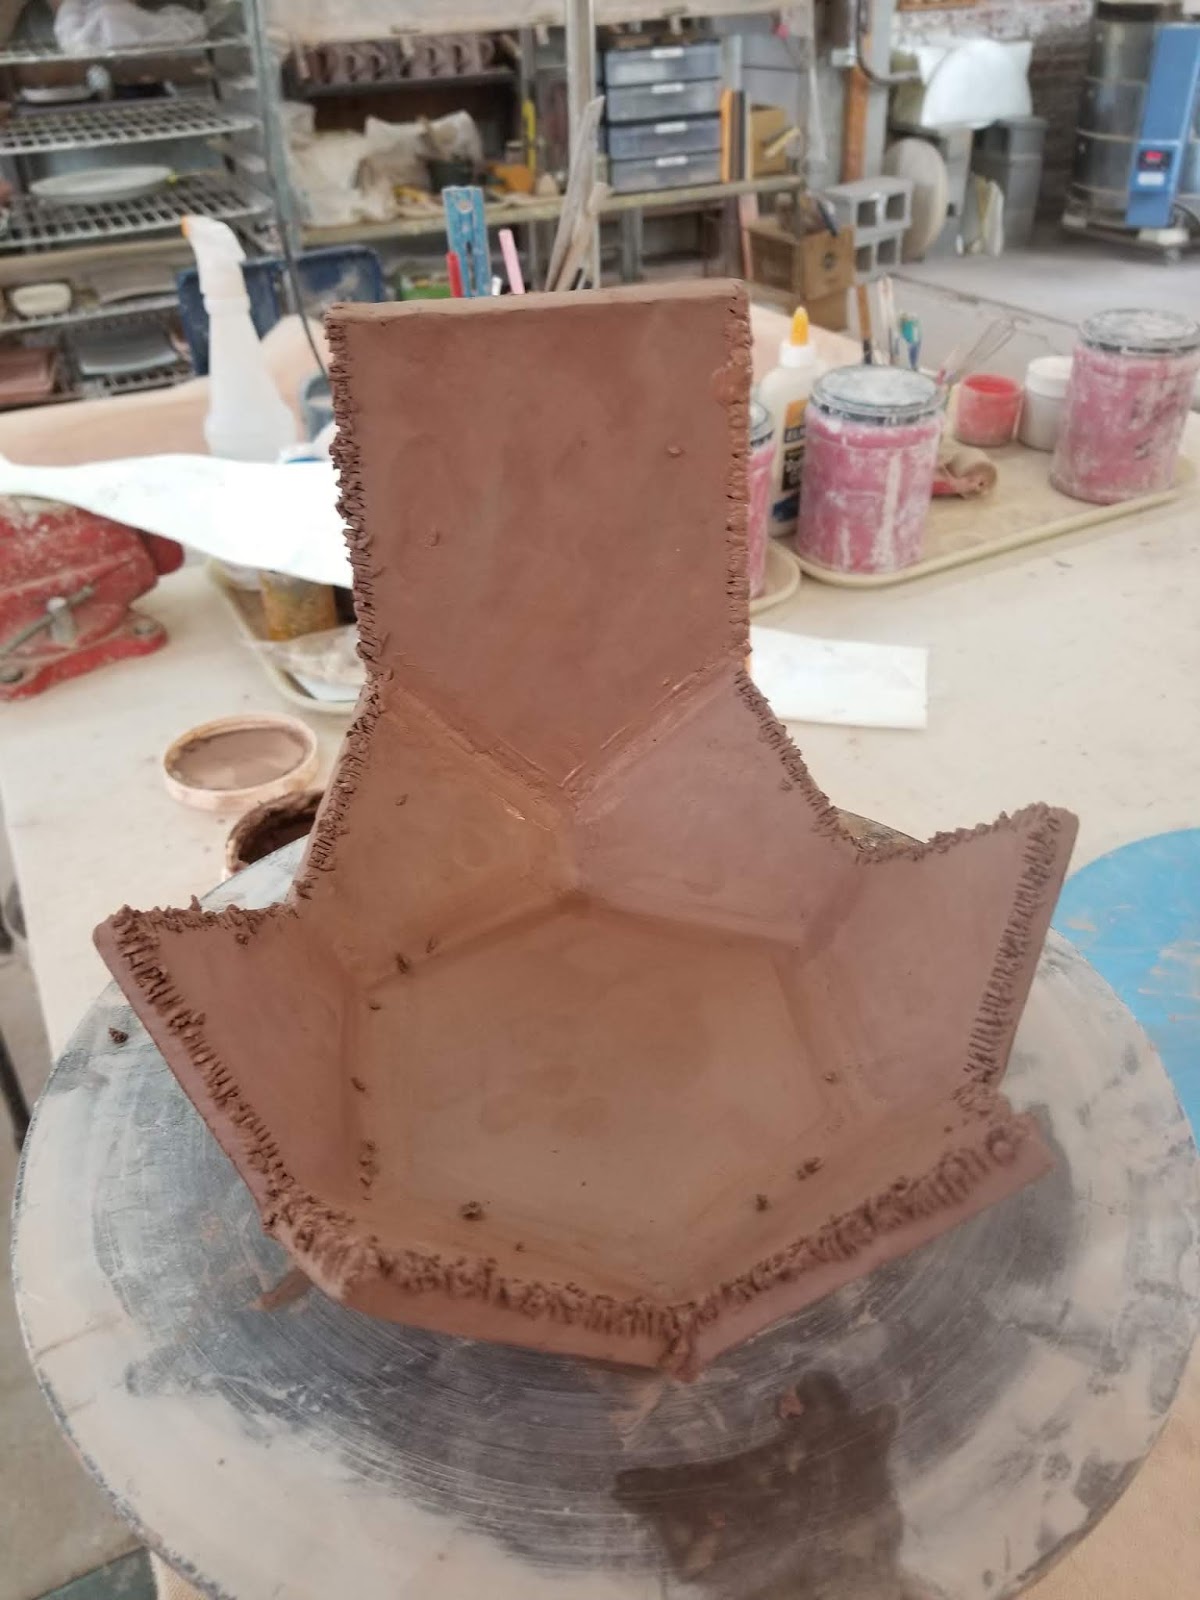
I started with a hexagon for the bottom of the pot and added 6 pentagons, one on each side.

I used a paper towel to keep the second "layer" from flopping down flat.  Some time in front of the fan did the trick to firm things up enough that I could keep working.

The last "layer" was more pentagons.

Each seam got a lot of attention both inside and outside the pot to make sure that I had good, strong joints everywhere.

I was really worried that one of those joints would crack.

It took the better part of a Saturday afternoon.

Finally got to put that last piece in place.
I was thrilled that everything fit.


This pot was a gift, so even though I worked on it in late November and early December, I waited until I knew that sharing this would not ruin any surprises. 

I've been working on several other unique projects that I'll share with you in another post. 

Saturday, November 23, 2019

My Tummy and My Heart Are Full

We had the first Annual A Griffin Pottery Pre-Holiday Party today at the studio and it was WONDERFUL!  Allen would have loved being there. I like to think that he was in some way.  None of those people would have even known each other if not for Allen and his willingness to teach us all pottery. 

This was originally Ronnie Blackburn's idea. He gets all the credit.  I was talking to him a week or two ago about when I planned to put the Christmas decorations up at the studio and he suggested the informal party.  FYI, my Christmas decorations are up now.  The weekend before Thanksgiving.  I have broken my hard and fast rule of one holiday at a time please.  The way the calendar worked out this year, it was necessary if we were going to be decorated for SMALL BUSINESS SATURDAY on Nov 30, so I am forgiven, right? 

Everyone brought something to share and we had a feast and wonderful time together. 

Vicki, Gail, Ronnie, and Lisa were there of course.  Lisa brought her sister Karen who is visiting from Georgia.  Karen was nice enough to take the group picture.


That's Karen in the light blue.  I must have caught Ronnie in mid-chew.  Sorry Ronnie.

Gail's husband Jamie stopped by for a bit.  He's in the black pullover.


We managed to get some work done in addition to the eating and socializing.

My new student Nikki was there too!  I am so happy that she was able to work in out to be here with us today. She got to meet everyone, have some food, and then we took care of her lesson.  

Trimming a foot.

Making a serving plate.

The cool thing about our studio is that we all learn from each other.  I learn from Vicki (have been for the 12 years I've been making pots) and from Gail and from Lisa and from Ronnie.  When Nikki comes for a lesson, she's got me (Lord help her) and everyone else who happens to be there to teach her. I'm sure that it is overwhelming at times, but today she wanted to try something that Gail does more often than I do, so Gail helped her a bit.  

From time to time, someone will say to me, "Allen would be proud," and it makes me so happy.  Most recently that was when I introduced Nikki to Vicki for the first time.  Allen would be proud that you have a student learning here.  Today, Nikki got labeled "Allen's Grand Potter."  I absolutely love it!! And Nikki got a glimpse of how important Allen Griffin was to all of us.  

Even Dixie doggie (#Dixiethefosterdog) was part of the action.

She had to stay in her crate when we had the food out, but she was a good girl about it.  She was very happy to check out the floor for dropped bits once we let her out.

Our studio was a happy, busy, crazy place today will all the people there and all the different things going on at once.  Allen would have LOVED it!  I miss him so.


Thursday, November 21, 2019

FEET


It's been a busy time in the pottery studio these last few weeks.  I had really good sales at the Carolina Pottery Festival the first Saturday in November and have been working hard ever since to restock so that there are lots of things to choose from for folks who will be Christmas shopping with me in the coming weeks. 

Longer hours in the studio take their toll on me.  I'm not as tired as I was when I was working a full time job and making as many pots as I could, but my feet are definitely sore and tired after 5 or 6 hours standing on the cement floor in my studio.  Have you noticed that when your feet hurt, everything hurts?  Your entire body balances on your feet, so a problem in that foundation can lead to problems in other parts of your body.  

Feet are also important on pots.  A nice foot on a bowl can make a bowl lighter and more graceful.  

Notice the bowl in the background that has not yet been trimmed.

Before trimming.

After trimming.

Trimming a foot on a piece can be a very scary process for a new potter.  I have been working with a new student this month.  Yes, you read that correctly, I have a student.  She's doing pretty well for someone who has no prior experience working in clay.  Centering is a challenge - as it is for EVERY potter.  I remember how it feels.  You know the clay is not centered, but you have no idea what to do differently to get it centered.  When it finally clicked for me was on a Saturday afternoon.  I think Vicki suggested that I try making some shot glasses.  (You can think toothpick holder if shot glass bothers you.  Same thing.  Small cylinders.)  Repeatedly centering a small amount of clay helped me learn what it felt like.  I also found that if I shut my eyes I could feel the clay move to the center of the wheel even though I had trouble seeing it. 

I've gotten side tracked. This is a post about feet.  This is not a post about centering or other challenges for the new student.  

This week's lesson included glazing, centering, and finishing up a couple of leather hard pieces from last week.  I had her trim a foot on the two bowls that she threw last week.  Holding the tool steady with the appropriate amount of pressure takes lots of practice. For the first time, she did well. She removed some extra clay from the bottom of her bowls and did not cut the bottom out of anything.  I have explained that at some point she will do this.  It will be sad when it happens, but life will go on.  In my case, a short hissy fit is necessary before life goes on, but it does eventually go on.  This is true for many fatal mistakes with clay.  I generally feel a lot better after throwing it across the room.  

Feet are important.  They are important on pots and important on people.  I've said a bunch of times to others how important it is to wear good shoes, and I have meant it every time. I meant it and continued to wear my old shoes to the studio. And my feet hurt.  A lot.  It is possible that my worn out shoes are the root of many of my most recent ailments.  So last week, I sucked it up and took my own advice.  I bought shoes for the studio.  

Brand new Dansko XP 2.0 clogs.

I spent more money than I am comfortable with on shoes that are already covered in clay drips and glaze splashes, but my feet do feel better at the end of the day.  I think I'm glad that I did.